Chatbot Integration with Facebook Messenger
This guide will walk you through the process of integrating our chatbot with your Facebook page using Facebook Messenger. After completing all the steps, your customers will be able to communicate with the chatbot directly through Facebook Messenger.
Table of Contents
- 0Integration Process Overview
- 1Creating an App on Facebook Developers
- 2Choosing the Use Case and App Type
- 3Connecting a Business Portfolio
- 4Adding the Messenger Product to the App
- 5Generating Access Tokens
- 6Obtaining the App Secret
- 7Configuring the Chatbot on the AI Chatbot Platform
- 8Configuring the Webhook on Facebook Developers
- 9Testing the Integration
- 10App Verification for Public Access
- 11Understanding Rate Limiting
- 12Troubleshooting
- 13Frequently Asked Questions
Choose Your Starting Point
Starting from Scratch
I don't have a Facebook app yet and need to go through the entire integration process
I Already Have an App
I already have a Facebook app created, but I need to configure Messenger
I Have Access Tokens
I already have Messenger configured and just need to connect it with our platform
Integration Process Overview
Integrating a chatbot with Facebook Messenger is a process that consists of several main stages:
- Creating an app on Facebook Developers - creating a new application that will serve as a bridge between the chatbot and Facebook Messenger.
- Configuring the Messenger product - adding the Messenger product to the app and connecting it with your business page.
- Obtaining the necessary tokens - generating access tokens and retrieving the app secret to enable authorized communication.
- Configuring the chatbot on our platform - entering the tokens and setting up the chatbot to work with Facebook Messenger.
- Setting up the webhook - configuring the callback address where Facebook will be able to communicate with the chatbot.
- Testing and verification - verifying the integration is working correctly and preparing for public use.
- Your Facebook account with administrator permissions for the business page
- Your account on our AI Chatbot platform with an active subscription
Creating an App on Facebook Developers
The first step of the integration is to create a new application on the Facebook Developers platform. This application will serve as a bridge between your chatbot and Facebook Messenger.
Detailed instructions:
- Go to https://developers.facebook.com
- Log in to your Facebook account. If you don't have a developer account yet, you will be prompted to create one.
- After logging in, click the My Apps button located in the top right corner of the page.
- On the page with the list of applications, click the Create App button, also located in the top right corner.
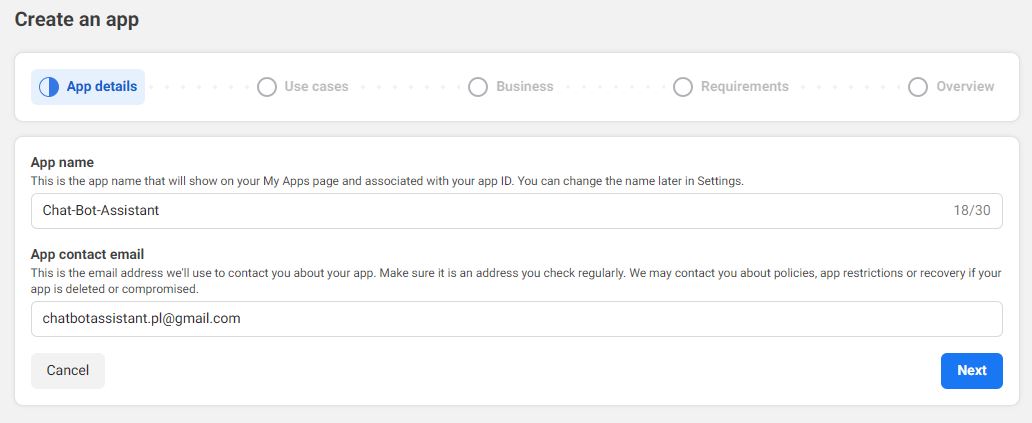
- A "Create an app" window will appear, where you need to enter basic information about the application:
- App name - enter the name of your application (e.g. "Company Name Chatbot"). This name will be visible in the admin panel but not to end users.
- App contact email - enter the email address that will be used for communication related to the application. We recommend using a business email address that you regularly check.
- After entering this information, click the Next button.
Common issues at this stage:
If you can't see the "Create App" button, the possible reasons are:
- You are not logged into your Facebook account
- Your account does not yet have developer account status
- The Facebook Developers interface may have changed
Solution: Make sure you are logged into your account. If so, try refreshing the page. If the problem persists, look for another option to create an application in the interface or contact our technical support.
If you're getting an error while trying to create the application, the possible causes are:
- An application with that name already exists on your account
- Your developer account requires additional verification
- You have reached the app creation limit for your account
Solution: Try using a different app name. If that doesn't help, check whether your account requires additional verification (Facebook usually displays an appropriate message). If necessary, follow the account verification instructions.
Choosing the Use Case and App Type
After providing the app name and email address, you need to specify what it will be used for and what type of application you want to create. This is an important step because it affects the available features and how the application is verified by Facebook.
Detailed instructions:
- After clicking "Next" in the previous step, you will see a page with various use cases. Facebook offers many predefined templates for different types of applications.
- For chatbot integration, the best choice is the Other option, which is located at the very bottom of the list. This option allows for the most flexible application configuration.
- After selecting the "Other" option and clicking "Next", you will be prompted to choose the application type.
- Select the application type Business.
- Click "Next" to proceed to the next stage.

Detailed description of app types:
Facebook offers two main types of applications:
This application type is intended for companies and organizations that want to use Facebook's business features, such as:
- Integration with Facebook Messenger for customer service
- Creating and managing advertising campaigns
- Analyzing business data and statistics
- Accessing Facebook API for commercial purposes
Business applications are subject to verification by Facebook, especially if they require access to additional permissions or user data.
This application type is intended for applications aimed directly at individual users, such as:
- Games and entertainment applications
- Social applications
- Personalization tools and lifestyle applications
Consumer applications may also be subject to verification, especially if they require access to user data or use Facebook login features.
This type is not recommended for business chatbots, as it may restrict access to some Messenger API features.
Connecting a Business Portfolio
For the application to work in Live mode and be available to all users, it must be connected to a business portfolio (Business Manager). This step is crucial for the proper functioning of the chatbot.
Detailed instructions:
- After selecting the application type as "Business", you will be prompted to enter additional information, including connecting a business portfolio (Business Manager).
- In the Business portfolio section, you will find a dropdown list with available business portfolios. If you already have a business portfolio on Facebook, select it from the list.
- If you don't have a business portfolio yet, you will need to create one before continuing. Facebook will display an appropriate message with a link to create a new portfolio.
- After selecting the business portfolio, review the remaining information and click the Create App button.
- You will be asked to confirm the operation with your Facebook password. Enter your password and click "Submit".

How to create a Business Portfolio (Business Manager)?
If you don't have a business portfolio yet, you can create one by following these steps:
- Go to https://business.facebook.com/overview
- Click the "Create account" button
- Enter the company name, your first and last name, and your business email address
- Provide company details such as address, industry, and website
- After creating the portfolio, you can add your business pages that you own or manage
- After creating the portfolio, return to the app creation process and select the newly created portfolio from the list
Important: A business portfolio is essential for business applications that are intended to operate in a production environment. It provides an additional level of security and enables access management for different employees.
If you're having problems connecting a business portfolio, check the following:
- Make sure you have administrator permissions in the business portfolio
- Check whether the business portfolio has been fully configured and verified by Facebook
- If the portfolio requires verification, follow Facebook's instructions to complete the verification process
- If problems persist, try refreshing the page or clearing your browser cache
If problems continue, it's worth contacting Facebook's technical support or our support team for additional help.
Adding the Messenger Product to the App
After successfully creating the application, the next step is to add the Facebook Messenger product to it. This product will enable your application to use the Messenger API, which is essential for chatbot integration.
Detailed instructions:
- After creating the application, you will be redirected to the application dashboard. It will contain a section "Add products to your app" with various Facebook products.
- Find the Messenger tile among the available products.
- Click the Set up button located in the Messenger tile.
- After adding the product, a new "Messenger" section will appear in the sidebar menu on the left side.
- Click on this section, then expand it using the arrow next to it.
- From the expanded list, select the Messenger API Settings option to go to the Messenger API settings.

Navigating the Facebook Developers Panel
The Facebook Developers panel can sometimes seem unintuitive and complex. Here are some navigation tips:
The sidebar menu in the Facebook Developers panel is divided into several main sections:
- Dashboard - the main application dashboard
- App settings - general application settings, including basic information, advanced settings, and user roles
- Product sections - each added product (like Messenger) has its own section in the menu
- Analytics - statistics and analytics about application usage
- Alerts - notifications and alerts related to the application
When configuring the chatbot, you will primarily work with the Messenger section and App settings.
If you can't see the Messenger section in the sidebar menu after adding the product, try the following steps:
- Refresh the page - sometimes menu changes are not immediately visible
- Check whether the Messenger product was correctly added - return to the dashboard and make sure Messenger is listed among the products
- If you still can't see the Messenger section, go back to the dashboard and click "Set up" again on the Messenger tile
- In extreme cases, you may need to log out and log back into the Facebook Developers panel or delete and recreate the application with the "Other" type
Additional Messenger settings
After navigating to the Messenger API settings, you will see various configuration options. At this stage, the most important section is "Generate access tokens", which we will cover in the next step. The remaining options will be configured in later stages of the integration process.
Generating Access Tokens
Access Tokens are essential for establishing secure communication between the Facebook platform and your chatbot. In this step, you will connect the application with your Facebook page and generate a Page Access Token.
Detailed instructions:
- In the Messenger API settings, find the Generate access tokens section. This section allows you to connect the application with your Facebook page.
- Click the Connect (or Add Page) button to start the page connection process.
- A dialog box about account connection will appear. Click Continue to proceed.
- In the next window, you will be asked to continue as the currently logged-in user. Click Continue as [Your username].
- Next, you will see a list of pages you manage. Select the business page you want to connect with the chatbot and click Continue.
- Facebook will ask about the permissions the application should have for the selected page. In most cases, you should leave all default permissions checked.
- Finally, click the Save button to add the page to the Messenger product.
- After correctly completing these steps, a green confirmation badge will appear next to the "Generate access token" section, and your page will be displayed below.
- Click the Generate button next to your page name to generate the access token (Page Access Token).

After clicking the Generate button, you will see a window with the generated page access token. To be able to copy this token, you must first check the I Understand option, confirming that you understand the importance of token security.

Token troubleshooting
If you can't see your page on the list when trying to connect, the possible causes are:
- You don't have administrator permissions for that page
- The page has not yet been added to your business portfolio
- You are logged into the wrong Facebook account
Solution: Make sure you have administrator permissions for the page and that it is connected to your business portfolio. If the problem persists, try logging into the appropriate account or adding the page to your business portfolio.
If you're getting an error while trying to generate the token, the possible causes are:
- Internet connection issues
- Temporary issues with the Facebook Developers platform
- Insufficient permissions for the page
- The application doesn't have the required permissions to generate tokens
Solution: Refresh the page and try again. Make sure your application has "Live" status (if not, it may be operating in developer mode, which restricts some features). Also check that you have all the necessary permissions to manage the page.
Page Access Tokens can expire for various reasons, such as:
- Changing the Facebook account password
- Revoking application permissions
- Changes in Facebook security settings
- Natural token expiration after a long period
Solution: If the token has stopped working, generate a new token by repeating the process described above. Then update the token in the chatbot configuration on our platform.
Obtaining the App Secret
In addition to the page access token, the full chatbot integration also requires the App Secret. This is a unique identification code used to authenticate requests between your application and the Facebook platform.
Detailed instructions:
- In the Facebook Developers panel, go to the application settings by clicking the App settings tab in the sidebar menu on the left side.
- From the expanded list, select the Basic option to go to the basic application settings.
- In the basic settings section, at the top of the page, you will find two important values:
- App ID - the application identifier, which is publicly visible
- App secret - the application secret, which is hidden and used for authentication
- Next to the "App secret" field, there is a Show button. Click this button to display the app secret.
- You will be asked to confirm your identity by entering your Facebook account password. Enter your password and confirm.
- After confirmation, the app secret will be displayed. Copy it and store it in a safe place, just like the page access token.

Resetting the app secret
If you suspect that the app secret has been compromised, you can reset it:
If you need to reset the app secret, follow these steps:
- Go to the basic application settings (App settings > Basic)
- In the App Secret section, click the "Reset" button located next to the "Show" button
- Confirm the operation by entering your Facebook account password
- Facebook will generate a new app secret that will replace the previous one
- Copy the new secret and update it in all places where the previous one was used
Important: Resetting the app secret will invalidate all existing connections and tokens. You will need to update the secret in all services that use it, including the chatbot configuration on our platform.
Resetting the app secret has several significant consequences:
- All existing access tokens will stop working and will need to be regenerated
- All integrations using the old app secret will stop working
- You will need to update the secret in all places where it was used
- Users may experience temporary service interruptions during the update
Due to these consequences, resetting the app secret should only be done in justified cases, such as suspected leaks or compromise.
Configuring the Chatbot on the AI Chatbot Platform
After obtaining the necessary tokens and secrets from the Facebook Developers platform, the next step is to configure the chatbot on our platform. In this step, you will connect the chatbot with your Facebook page using the previously obtained credentials.
Detailed instructions:
- Log in to your account on the ChatBotAssistant platform.
- Go to the Create Chatbot section in the navigation panel.
- Select Facebook Messenger as the chatbot platform.
- Fill in the chatbot creation form, entering the following data:
- Chatbot Name - enter the name that will be used internally on our platform
- Description - optionally add a short description of your chatbot or its functions
- Company Information - enter detailed information about your company, products, services, prices, business hours, etc. The more information you provide, the better the chatbot will respond to customer questions. You can edit your company information later
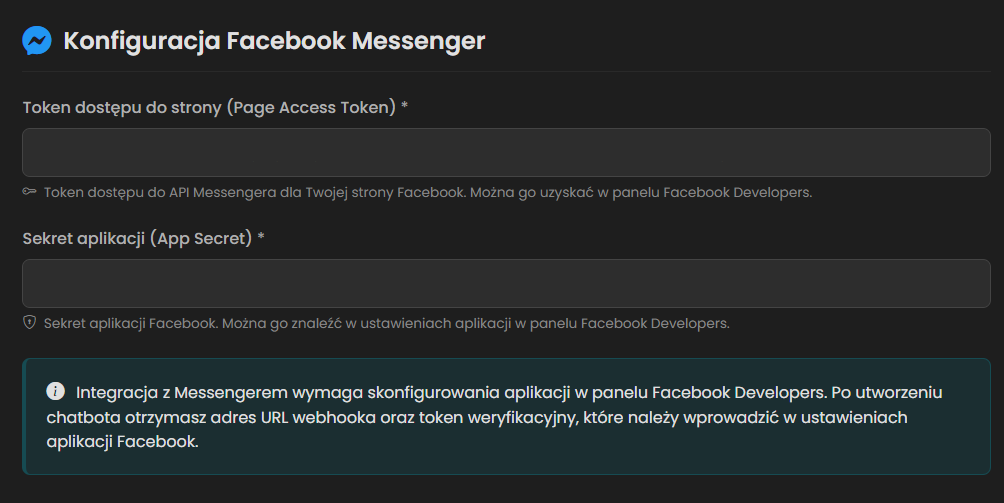
- Page Access Token - paste the token generated in step 5
- App Secret - paste the app secret obtained in step 6
- Click the Create Chatbot button to save the configuration.
After creating the chatbot, the system will automatically redirect you to the chatbot management panel and generate two important pieces of information that will be needed in the next step. To obtain them, click the Edit button next to the newly created chatbot:
- Verification Token (Verify Token) - a unique code used to verify the webhook
- Webhook URL - the address where Facebook will communicate with the chatbot

Tips for the "Company Information" field
Remember that the more detailed and comprehensive the information you include in the Company Information section, the more accurate, faster, and more natural your chatbot's responses will be - this will improve its usefulness and your users' satisfaction.
Enter key information that will allow the chatbot to quickly identify the company.
- Name - full and abbreviated form (if applicable).
- Year of establishment / brief history - key milestones and turning points.
- Mission / values - main goals and principles of operation.
- Location / area of operation - addresses, regions, online vs. on-site.
- Business hours - days of the week, possible breaks, holiday exceptions.
- Contact channels - phone, email, chat, social media, web form.
Describe what the company does, who it serves, and what makes it stand out.
- Industry and specialization - main areas of operation (products, services).
- Target audience - customer segments, their needs and expectations.
- Unique selling proposition (USP) - what sets the company apart from competitors.
Present available products or services in a clear format.
- Main categories - major product lines or service packages.
- Subcategories and examples - selected products/services from each category.
- Parameters / variants - technical specifications, sizes, colors, service levels.
- Approximate prices - price ranges or sample price lists.
Describe order fulfillment procedures, support, and return policies.
- Delivery / service fulfillment - area, turnaround time, costs.
- Professional additional services - assembly, installation, training.
- Payment methods - available methods, possible installments or leasing.
- Complaints / returns / warranties - conditions, procedures, deadlines.
Define how the chatbot will convey information in line with your brand.
- Tone selection - formal, informal, expert, friendly.
- Language level - industry jargon vs. colloquial, avoiding unclear terms.
- Unique phrases - distinctive brand phrases and slogans.
- Consistency - maintaining a uniform style throughout the description.
Configuring the Webhook on Facebook Developers
The last key stage of the integration is configuring the webhook in the Facebook application. The webhook enables Facebook to send messages and events to your chatbot, which is essential for its proper functioning.
Detailed instructions:
- Return to the Facebook Developers panel and go to the application you are configuring.
- In the sidebar menu, select the Messenger tab, then Messenger API Settings.
- Scroll down the page to the Configure Webhooks section.
- Click the Configure Webhooks or Add Callback URL button, depending on the interface.
- In the opened form, enter the following data:
- Callback URL - paste the webhook URL copied from the ChatBotAssistant platform
- Verify Token - paste the verification token copied from the ChatBotAssistant platform
- Check the messages option in the "Subscription Fields" section. This field is crucial because it enables receiving messages from users.
- Click the Verify and Save button to save the configuration and verify the webhook.

After saving the webhook configuration, you should see a list of available subscription fields. You need to activate the subscription for messages:
- Scroll through the webhook fields list alphabetically until you find the messages field.
- Click the toggle next to this field to change its status from Unsubscribed to Subscribed.

The final step is configuring the subscription for the page:
- Scroll down to the Generate access tokens section.
- Find your page on the list and click the Add Subscriptions button next to it.
- In the opened dialog box, check the messages field.
- Click Confirm to save the changes.

Webhook troubleshooting
If you're getting an error during webhook verification, the possible causes are:
- Incorrect webhook URL - make sure you copied it exactly from the AI Chatbot platform
- Incorrect verification token - check that the token was copied without extra spaces
To solve these problems:
- Check the URL address and verification token carefully
- Try resetting the access token on the Facebook Developers platform and update it in the chatbot configuration
- Try deleting the chatbot on the ChatBotAssistant site and creating it again
If the webhook was verified but the chatbot is not receiving messages, possible causes are:
- No active subscription for the field "messages"
- No subscription for the page
- Application permission issues
- Application is in development mode
To solve these problems:
- Make sure the field "messages" is in state "Subscribed" in the webhook configuration
- Check if you added the subscription "messages" for your page
- Verify that the application has all necessary permissions
- Make sure the application is in live mode, not in development mode
Webhook SSL certificate
Our ChatBotAssistant platform automatically provides a valid SSL certificate for all webhooks, so if you are using our URL, you should not have any SSL certificate issues.
Testing the Integration
After configuring all the necessary elements, it's time to test the integration and make sure the chatbot works as expected. Testing should include verification of basic functions and usage scenarios.
Detailed testing instructions:
- Basic communication test:
- Go to your Facebook page
- Click the "Send Message" button or the Messenger icon
- Send a simple test message, e.g. "Hello"
- Check if the chatbot responds to the message
- Basic feature testing:
- Try various predefined scenarios that you configured in the chatbot
- Check whether the chatbot correctly recognizes intents and responds appropriately
- Error handling test:
- Send a message that the chatbot probably won't understand
- Check if the chatbot responds with an appropriate error message or a request for clarification
- Testing in different scenarios:
- Test the chatbot in both the desktop Messenger interface and the mobile app
- Check how the chatbot handles longer conversations
Monitoring and analyzing chatbot performance
After launching the chatbot, it's important to monitor its performance and analyze interactions with users:
Our platform offers advanced analytical tools that allow you to monitor and optimize chatbot performance:
- General statistics: total number of queries and sessions, average conversation length, average response time (with automatic comparison to the previous period)
- User activity: interactive charts (day/week/month) with zoom in/out functionality and traffic distribution by day of the week and hour
- User behavior: session length divided into ranges (1-2, 3-5, 6-10, 10+ messages) and return rate
- Popular topics analysis: Top 5 most frequently discussed topics with percentage share
- Optimization suggestions: automatically generated recommendations based on collected data
- Data export: ability to download reports for further analysis
To access analytics:
- Log in to the chatbot administration panel
- Go to the "Dashboard" section
- Then scroll down to your chatbot list
- Select the chatbot you're interested in and click the "Analytics" button
- Browse detailed data and usage statistics for your chatbot
App Verification for Public Access
If you want your chatbot to be available to all users (not just administrators and testers), your Facebook application must go through the verification process. This is required by Facebook to ensure security and compliance.
When is app verification needed?
App verification is required in the following cases:
- You want the chatbot to be available to all Facebook users, not just administrators and testers
- Your application requires access to extended permissions and data
App verification process:
- Preparing the application:
- Make sure all required fields in the app settings are filled in (icon, description, category)
- Update the privacy policy and terms of service information
- Prepare instructions for the Facebook review team describing how to test your chatbot
- Submitting the verification request:
- In the Facebook Developers panel, go to the "App Review" section in the sidebar menu
- Click the "Request approval" button for the permissions that require verification
- Fill in the form, providing detailed information about your application and its use
- Attach screenshots and demo videos showing how your chatbot works
- Waiting for verification:
- The verification process can take from several days to several weeks, depending on the complexity of the application
- Facebook may request additional information or clarifications during the process
- Be ready for a quick response to questions from the review team
- After approval:
- After positive verification, switch the application from developer mode to "Live" mode
- Make sure all configurations are ready for production operation
- Monitor the chatbot's operation after launch to quickly respond to potential issues
Most common reasons for verification rejection:
Facebook often rejects verification requests when the documentation is incomplete or imprecise:
- Missing or incomplete testing instructions
- Unclear description of application functionality
- No explanation of what the requested permissions will be used for
- Insufficient visual materials (screenshots, videos)
Solution: Prepare detailed documentation containing an exact description of chatbot functionality, step-by-step instructions for testers, and an explanation of why you need specific permissions. Include high-quality screenshots and demo videos.
An inadequate privacy policy is a common reason for rejection:
- Missing privacy policy or a broken link to it
- The policy doesn't explain what data is collected and how it is used
- No information about cookies and other tracking technologies
- Insufficient explanation of users' rights regarding their data
Solution: Make sure your privacy policy is complete, up-to-date, and compliant with GDPR and other data protection regulations. It should clearly explain what data the chatbot collects, how it is used, stored, and secured.
Facebook rejects requests when the application asks for permissions that are not essential for its functioning:
- Requesting access to data not used by the chatbot
- Requesting too broad a scope of permissions relative to the functionality
- No justification for the need for specific permissions
Solution: Only request permissions that are absolutely necessary for your chatbot to function. For each requested permission, prepare a clear justification explaining why it is needed and how it will be used.
Rate Limiting
Rate limiting is a mechanism that restricts the number of messages a user can send to the chatbot through Facebook Messenger within a specified time period. It protects the system from excessive load and ensures fair resource usage.
How Rate Limiting works:
- Per-user limit: Each user has their own limit (not shared with others)
- Time window: 60 seconds
- Automatic reset: The counter resets every minute
- Configurable limit: Each user can have a different limit set by the administrator
What this means for users:
When a user reaches their message limit within a minute, the chatbot will display a message informing them to wait before sending another message. After one minute from the first message in the given time window, the counter automatically resets.
Increasing rate limiting limits:
If the standard rate limiting limits are not sufficient for your use case (e.g. for chatbots with very high traffic or specialized applications), you can request an increase.
Troubleshooting
Despite carefully following all integration steps, problems with the chatbot may sometimes arise. This section presents solutions to the most commonly encountered issues.
Common problems and their solutions:
Possible causes:
- The webhook is not properly configured or verified
- No active subscription for the "messages" field
- The Page Access Token has expired or is invalid
- The application is in development mode and the user is not a tester
- Network connection issues
Solution:
- Check the webhook configuration - make sure the URL and verification token are correct
- Verify that the "messages" field has "Subscribed" status both in the webhook configuration and in the page subscriptions
- Generate a new page access token and update it in the chatbot configuration
- If the application is in developer mode, make sure the testing user is added as a tester
Possible causes:
- Incorrect webhook URL
- Incorrect verification token
Solution:
- Make sure the webhook URL is correct and does not contain extra spaces
- Check that the verification token is exactly the same as the one generated on the ChatBotAssistant platform
- Try resetting the access token on the Facebook Developers platform and update it in the chatbot configuration
- Try deleting the chatbot on the ChatBotAssistant site and creating it again
Possible causes:
- Insufficient contextual data for the AI model (Company Information)
- Lack of support for specific scenarios in the chatbot configuration
Solution:
- Expand the chatbot's knowledge base with additional scenarios and example questions
- Add more synonyms and phrase variants to existing intents
- Regularly analyze and test the chatbot based on analytics
Possible causes:
- Incomplete documentation or testing instructions
- Privacy policy issues
- Excessive permission requests without justification
Solution:
- Carefully read the feedback from Facebook's review team
- Prepare complete and detailed documentation containing step-by-step instructions
- Make sure your privacy policy is complete and compliant with requirements
- Only request permissions that are absolutely necessary and justify their need
Frequently Asked Questions
In this section, you will find answers to the most frequently asked questions about chatbot integration with Facebook Messenger.
Yes, you can integrate the chatbot with multiple Facebook pages. There are two approaches:
- One Facebook application, multiple pages:
- In the "Generate access tokens" section, you can add multiple pages to one application
- You need to generate a separate access token for each page
- On our platform, create a separate chatbot for each page using the appropriate token
- This method is recommended when the chatbots have similar functionality
- Multiple Facebook applications:
- Create a separate Facebook application for each page
- Perform the full integration process for each application
- This method provides greater flexibility and isolation but requires more administrative work
- It is recommended when chatbots have significantly different functionality or require different permissions
The choice of method depends on your specific needs and organizational structure.
Page Access Tokens can expire for various reasons:
- Standard tokens: Tokens generated directly from the Facebook Developers interface can expire after approximately 60 days
- Long-lived tokens: Tokens generated using the appropriate process can be valid for much longer, even up to several years
- Events forcing expiration: Changing the administrator's password, revoking application permissions, or changes in security configuration can cause premature token expiration
How to renew tokens:
- Monitor the chatbot's operation - if it stops responding, it may indicate token expiration
- In the Facebook Developers panel, go to the Messenger API settings and generate a new access token
- Update the token in the chatbot configuration on our platform
- Test the chatbot after updating the token to make sure it works correctly
Facebook Messenger offers limited visual customization options for chatbots:
- Profile icon: You can customize the chatbot's profile icon by changing the profile picture of your Facebook page
- Chatbot name: The chatbot name will be the same as your Facebook page name
There are several ways to monitor user interactions with the chatbot:
- Analytics panel on the ChatBotAssistant platform:
- General statistics: total number of queries and sessions, average conversation length, average response time (with automatic comparison to the previous period)
- User activity: interactive charts (day/week/month) with zoom in/out functionality and traffic distribution by day of the week and hour
- User behavior: session length divided into ranges (1-2, 3-5, 6-10, 10+ messages) and return rate
- Popular topics analysis: Top 5 most frequently discussed topics with percentage share
- Optimization suggestions: automatically generated recommendations based on collected data
- Data export: ability to download reports for further analysis
- Facebook Page Insights:
- Total number of messages sent to your page
- Demographic data of users using Messenger
- Response times and engagement metrics
- Data export and analysis:
- Our platform allows exporting conversation data to CSV or JSON formats
- You can analyze this data using external analytical tools
- This allows you to create custom reports and in-depth analysis
Regular monitoring and analysis of this data will help you optimize the chatbot and better adapt it to user needs.